NiHaL
Aktif Üyemiz
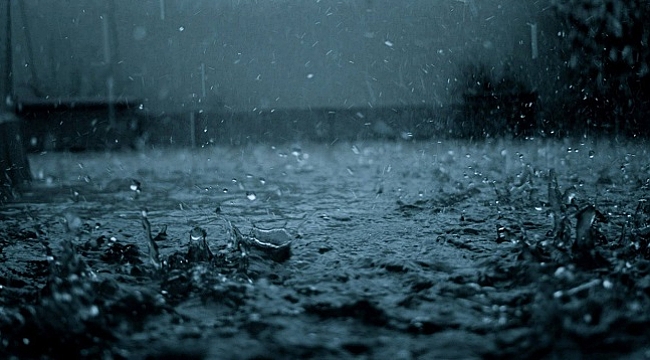
Photoshop ve Imageready'i kullanarak istediğimiz resimlerimize yağmur veya kar yağdırabiliriz.
Örnekteki gibi yağmur yağdırmak için:

Resmimizi açıyoruz. Windows menüsünden Action paletini açıyoruz.
 This image has been resized. Click this bar to view the full image. The original image is sized 1280x996.

This image has been resized. Click this bar to view the full image. The original image is sized 1280x996.

Eğer action paletinde Image Effects açık değilse actions paletinin sağ üst kısmındaki oka tıklayıp açabiliriz
This image has been resized. Click this bar to view the full image. The original image is sized 1280x996.

Daha sonra light rain seçeneğine tıklayıp aşağıdaki play işaretine tıklıyoruz.Bu işlemi 3-4 kez tekrarlıyoruz
This image has been resized. Click this bar to view the full image. The original image is sized 1280x996.

This image has been resized. Click this bar to view the full image. The original image is sized 1280x996.

Daha sonra image readye geçiyoruz.
This image has been resized. Click this bar to view the full image. The original image is sized 1280x996.

Windows menüsünden animation paletini açıyoruz.
İlk frame seçiliyken yağmur layerlarından 1.sini görünür yapıyoruz. Diğerlerini gizliyoruz.
This image has been resized. Click this bar to view the full image. The original image is sized 1280x996.

Daha sonra ikinci frame'i oluşturuyoruz ve bu sefer yağmur layerlarından sadece 2. sini görünür yapıyoruz.
Aynı şekilde bir üçüncü frame daha oluşturup bu sefer 3. yağmur layer'ını görünür yapıyoruz.
This image has been resized. Click this bar to view the full image. The original image is sized 1280x996.

Zaman ayarını 0 sec. yazan yere sağ tıklayıp yapabiliriz.
ve play tuşuna basıyoruz.
Kaydetme işleminide file/save optimize as açıyor ve save diyoruz.
İşte animasyonumuz.
Örnekteki gibi yağmur yağdırmak için:

Resmimizi açıyoruz. Windows menüsünden Action paletini açıyoruz.
 This image has been resized. Click this bar to view the full image. The original image is sized 1280x996.
 This image has been resized. Click this bar to view the full image. The original image is sized 1280x996.

Eğer action paletinde Image Effects açık değilse actions paletinin sağ üst kısmındaki oka tıklayıp açabiliriz
This image has been resized. Click this bar to view the full image. The original image is sized 1280x996.

Daha sonra light rain seçeneğine tıklayıp aşağıdaki play işaretine tıklıyoruz.Bu işlemi 3-4 kez tekrarlıyoruz
This image has been resized. Click this bar to view the full image. The original image is sized 1280x996.
 This image has been resized. Click this bar to view the full image. The original image is sized 1280x996.

Daha sonra image readye geçiyoruz.
This image has been resized. Click this bar to view the full image. The original image is sized 1280x996.

Windows menüsünden animation paletini açıyoruz.
İlk frame seçiliyken yağmur layerlarından 1.sini görünür yapıyoruz. Diğerlerini gizliyoruz.
This image has been resized. Click this bar to view the full image. The original image is sized 1280x996.

Daha sonra ikinci frame'i oluşturuyoruz ve bu sefer yağmur layerlarından sadece 2. sini görünür yapıyoruz.
Aynı şekilde bir üçüncü frame daha oluşturup bu sefer 3. yağmur layer'ını görünür yapıyoruz.
This image has been resized. Click this bar to view the full image. The original image is sized 1280x996.

Zaman ayarını 0 sec. yazan yere sağ tıklayıp yapabiliriz.
ve play tuşuna basıyoruz.
Kaydetme işleminide file/save optimize as açıyor ve save diyoruz.
İşte animasyonumuz.